Windows 11 clean install
You can follow the steps outlined in the video to install Windows 11 Pro or Windows 11 Home on a PC. Clean install means that you are deleting all the data on the computer, pls. make a backup of all your files and settings before you proceed.
How to make clean install of Windows 11 Pro or Windows 11 Home
Technical Level: Intermediate.
Applies to: All Windows 11 editions.
Contents:
- Summary
- Preparing for clean install of Windows 11
- Windows 11 minimum hardware requirements
- Things you’ll need for clean install
- Creating bootable USB drive
- Steps to install Windows 11
- Video demonstration
Summary: Typically, a clean installation is performed either by formatting the existing operating system or by using a drive with no operating system already installed. To execute a clean installation, the initial step involves creating a bootable USB drive. After which we can boot from it and select either the current operating system drive for formatting or an empty drive for installing Windows 11. When the Windows setup is complete, we will proceed to finish the Out of Box Experience (OOBE). Following the completion of OOBE, we should be able to utilize Windows 11 just as we would with previous Windows operating systems.
Preparing for clean install of Windows 11: Before proceeding for a clean install, you should be aware of following things:
- When performing a new installation, it is necessary to activate Windows using your authentic product key. If you are reformatting a current operating system, be sure to have your genuine product key on hand. It is available for purchase on our website here.
- If you decide to format your existing operating system, all your data and software will be erased. Consequently, it is essential to ensure that you save all crucial data to an external hard drive or cloud service like OneDrive. The data you back up can be restored once you perform a clean install and complete the OOBE setup.
- Before performing a clean installation, make sure that the device has enough battery life. If it doesn’t, you can keep it plugged in to a power source while you carry out the clean installation process.
Windows 11 minimum hardware requirements:
- Processor: 1 GHz or faster with 2 or more cores on a compatible 64-bit processor or System on a Chip (SoC).
- RAM: 4 GB or above.
- Storage: More than 64 GB.
- System firmware: UEFI, Secure Boot capable.
- TPM: Trusted Platform Module (TPM) version 2.0.
- Graphics card: Compatible with DirectX 12 or later with WDDM 2.0 driver.
- Display: High definition 720p display that is greater than 9” diagonally, 8 bits per color channel.
For details on above hardware requirements, refer this official Microsoft documentation: https://docs.microsoft.com/en-us/windows/whats-new/windows-11-requirements.
Things you’ll need for clean install:
- A bootable Windows 11 media, either a USB drive or a DVD with the Windows 11 image on it.
- Easy guide with Microsoft Media Creation tool
- Click here for a guide to create a bootable Windows 11 USB flash drive with more custom options (Rufus)
Steps to install Windows 11
Plug in the Windows 11 bootable USB drive or insert the Windows DVD. In BIOS settings, select to boot from this USB drive. Since BIOS instructions vary for different devices, you can refer your device manual/manufacturer’s instructions for exact steps for your system model.
1. Once you boot from the USB drive, after boot screen, you’ll see Windows Setup screen. Make your selections and click Next.

2. In the next screen, click on Install now button.

In few seconds, you’ll see Setup is starting on the screen.

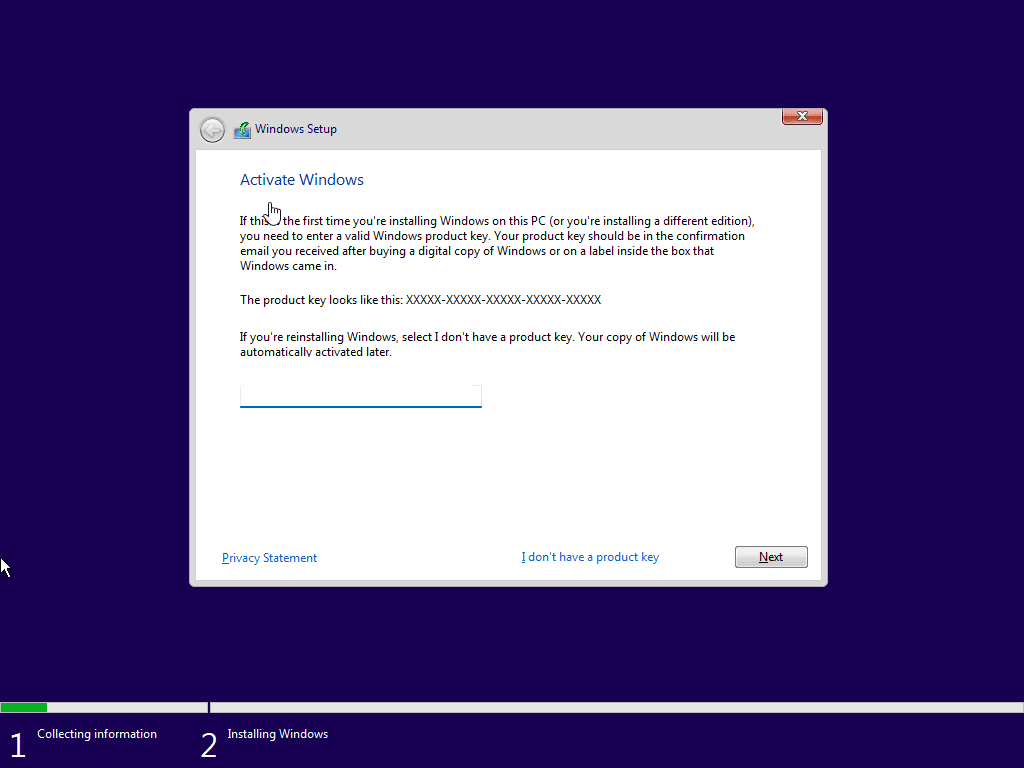
3. Under Activate Windows, type in your genuine product key (atm you can use Windows 10 product key here). Click Next. If you want to activate the system later, you can click I don’t have a product key link here.
4. If you see the next screen, select the Windows 11 edition you want. Depending on the installer media, this is already set for you.

5. Moving on, accept the Windows license terms and click Next.

6. Next, in Which type of installation do you want screen, select Custom: Install Windows only (advanced).

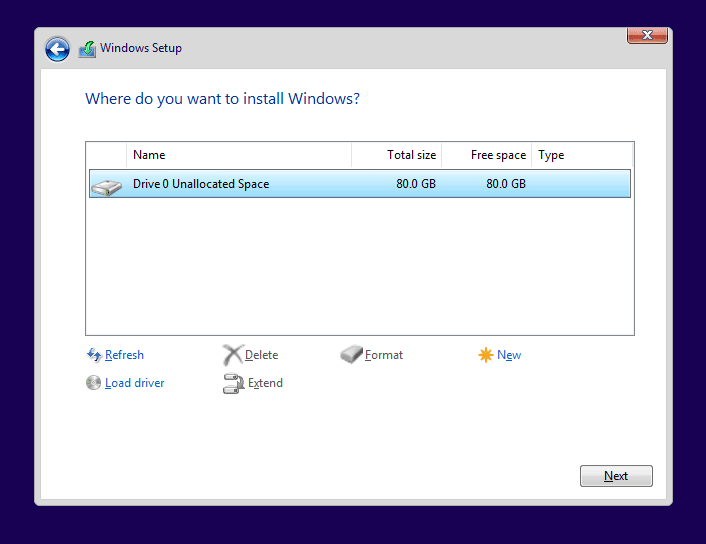
7. Now select the drive where you want to install Windows 11 and click Next.
8. Now Windows 11 will be installed based upon your previous selections. Let this screen complete and Windows will automatically restart after that.

9. When Windows restarts, it will take a while for Getting devices ready.

10. Once all required devices are ready, Windows will restart for OOBE setup. Initially, you’ll see Just a moment screen.

After that, you’ll see Windows 11 logo coming on the screen.

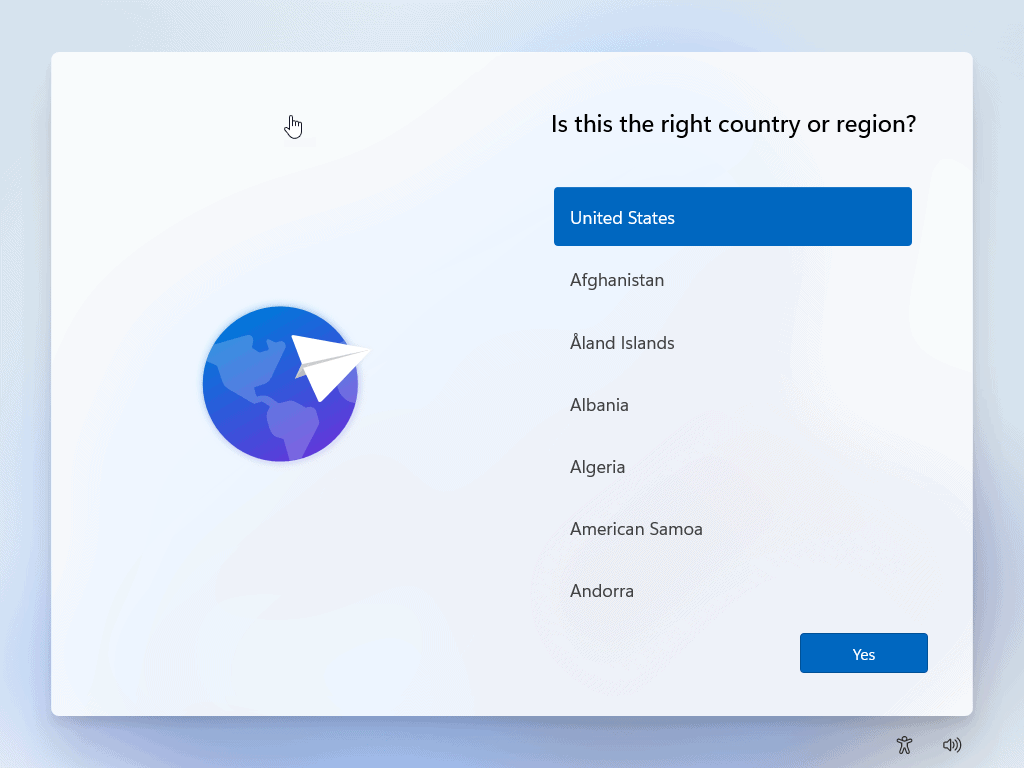
11. Now OOBE setup starts here. Note that OOBE setup may be different for different devices. You may not receive all screens mentioned in this guide. Also, you may get some OOBE screens not mentioned in this guide, as this depends on your device and selections. First OOBE screen is to select your country/region. Make your selection and click Yes.
12. Next, select the right keyboard layout/input method.

13. In the next screen, click Add layout, if you want second keyboard layout, else click Skip.

14. Then you’ll be asked to select your network. Once you select it, click Next.
NOTE: This screen may not appear, if you’re already connected to the Internet.

15. Once you connect to network, Windows will check for updates.

16. Then you’ll be asked to name your PC. Type in the system name you want and hit Next.
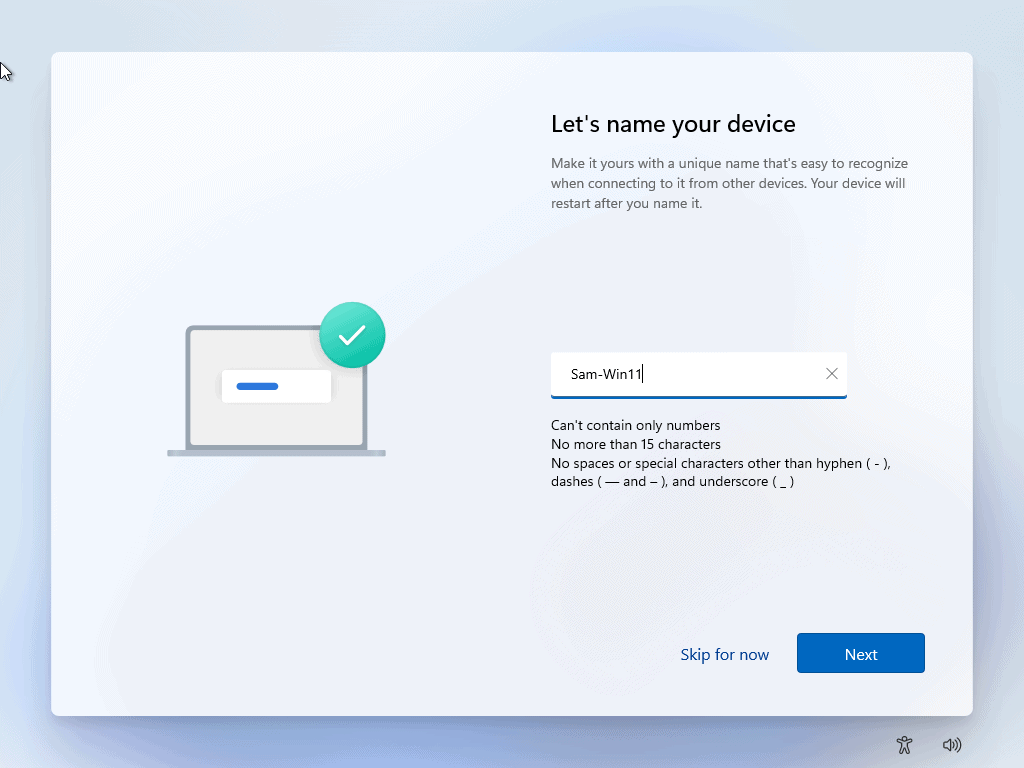
If you select to name the PC, Windows will restart to apply that change. If you clicked Skip for now, no restart occurs and you can continue to next step.

17. You can now select, whether you want to setup your device for personal or work or school usage. For this example, I selected Set up for personal use.

Set up for Personal Use
This option will require to login with a Microsoft Account. Click Sign In
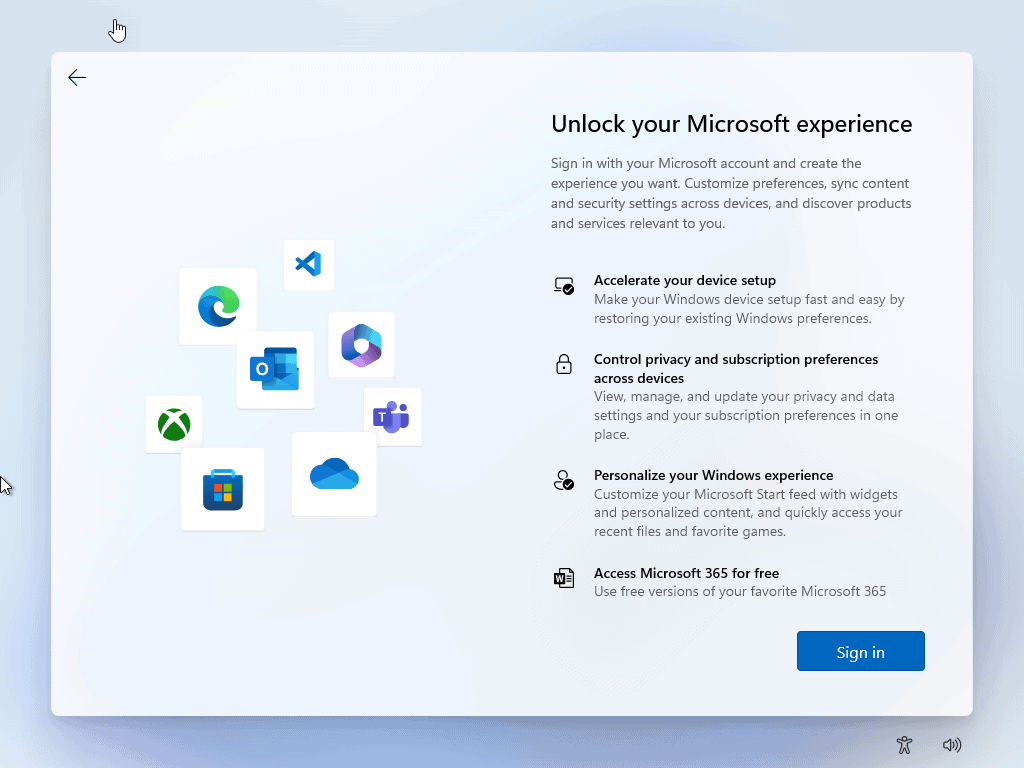
18. Type in your Microsoft account email ID at this step. If you don’t have a Microsoft account, you need to create one.

19. Type the Microsoft account password and clicked Sign in.

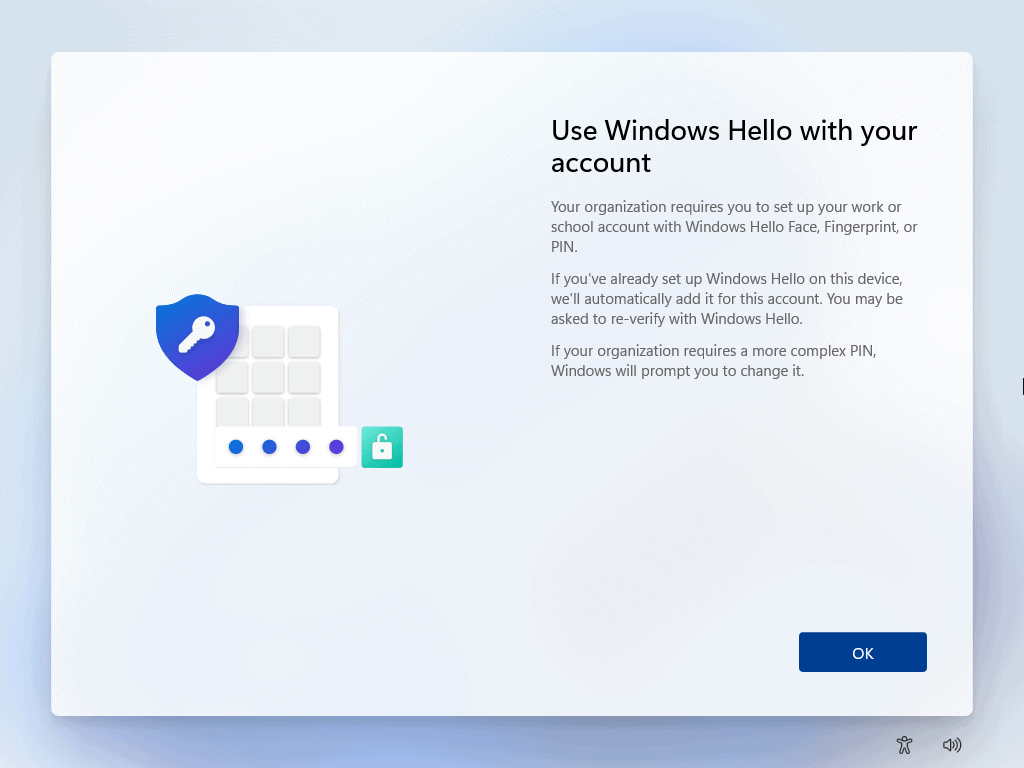
20. Next, I was asked to create Windows Hello PIN. I clicked Create PIN. You must create a PIN, as it is more secure than password and is convenient to use.

21. Now, I typed in 4-digit PIN but if you like, you can create a complex PIN by checking Include letters and symbols. Click OK then.

22. Since I signed in with my personal Microsoft account, I was asked to restore backup from OneDrive. To start this machine as fresh install, I selected Set up as new device option.

23. After this, you can select your device privacy settings (we recommend turning off everything) and click Accept.

24. Next, you can select a plan for personalized tips, ads and recommendations within Microsoft experiences and click Accept.

25. After this, you can select whether you want to back up your files with OneDrive and click Next. If you selected Don’t back up my files option here, you would be still able to enable OneDrive later on your system.

26. At the option to try premium Office apps for free with Microsoft 365, click No, thanks. This is a subscription. We recommend you buy the lifetime version of Microsoft Office Standard 2021 for a one time price.

27. After this, Windows will start checking for updates.

28. If it found some updates for you, they will be installed now. This update experience is new with Windows 11. On first screen, you’ll see Downloading progress.

Then you’ll see Installing progress.

And lastly, you’ll see Preparing to restart.

29. After this, updates will installed. Your system might restart during this.

30. Then you’ll be landed to login screen now. Type in your credentials and sign in to your account.

31. After this, Windows will start preparing for first time use. This may take a while.


32. Finally, you’ll be arrived to Desktop. Your Windows 11 is now ready to use. Go to System > Activation and if your system is shown activated there, you can personalize your Windows 11 as you like.
